Posts

Showing posts from January, 2025

Application Design /Final Project: High Fidelity App Design Prototype

Image
  Application Design /Final Project: High Fidelity App Design Prototype Starting from 12.2024 12.2024 -1.2025 / Week 13 - Week 15 Ge Xianjing / 0377636 Application Design 1 / Interactive Space Design Final Project / High-fidelity Application Design Prototype

Spatial Design 1 /Weekly learning

Image
  Weekly learning Week 1- Week 14 A few notes on what you’ve learned during lectures and through self-initiated learning. Week 1:  Introduction to Spatial Design https://www.youtube.com/watch?v=xkb3Og-bgJI Summary This document revolves around space design. Design inspiration can be traced back to early human cave dwellings, such as the Red Caves in Sarawak, Malaysia, which are significant in studying human migration. Nature serves as a rich source of inspiration, as seen in the hexagonal patterns of honeycombs inspiring architectural designs or the natural ventilation technology used in Hara, Zimbabwe, achieving energy efficiency and cooling.  First, it introduces its definition, emphasizes the connection between architecture, design and people, integrates professional advantages based on interior design, and the core is to create a space that fits the user, with equal emphasis on functionality and practicality.  Then, application examples are listed, such as educat...

3D Modeling PROJECT III (FINAL) : ORGANIC MODELING (CHARACTER)

Image
  PROJECT III (FINAL) : ORGANIC MODELING (CHARACTER) Homework requirements link https://docs.google.com/document/d/1KLtg95kMuurnvtv5Z01V-Y-jpcONvomFsd8mXjnBVnQ/edit?usp=sharing Brown Bear 🐻 Brown Bear 🐻

3D Modeling PROJECT 2 : THEMED SCENE-BASED MODELING

Image
  项目 2 : 主题场景建模 家庭作业要求 link https://docs.google.com/document/d/1MOva4sc-iet9RlLMKTYeccvKG8HuOpa6-OV2ICY9Et4/edit?usp=sharing 课堂教学记录 创建室内房间并添加光照和阴影的过程 1. 创建 Room 的基本结构 首先,您需要构建房间的基本模型: • 添加墙壁、地板和天花板:使用基本立方体 (Shift + A > Mesh > Cube) 构建房间的四面墙、地板和天花板。使用 S(缩放)和 G(移动)缩放和移动这些立方体,以调整它们的大小。 • 划分空间:如果房间有多个房间或隔板,请使用凸出 (E) 来划分墙壁或调整房间布局。 • 门窗:使用剪切工具 (切刀工具) 或布尔运算 (布尔修饰符) 创建门窗。使用 Boolean,您可以轻松地在门或窗的墙壁上钻孔。 2. 添加家具和其他物品 接下来,使用立方体、球体、圆柱体和其他基本几何体来添加家具,如桌子、椅子和沙发: • 家具建模:例如,为桌子创建一个矩形立方体,然后缩放它并添加四个小圆柱体作为桌腿。逐步调整比例和细节,使家具看起来更逼真。 • 布置家具:根据房间大小和布局,使用 G (移动)、R (旋转) 和 S (缩放) 来适当定位家具。 3. 添加照明 照明对于向对象添加阴影至关重要。在 Blender 中,您可以使用不同类型的灯光来获得所需的效果: • 选择灯光类型:按 Shift + A 添加灯光,然后选择合适的类型: • Point Light:从某个点发射光线,适用于模拟常规灯泡。 • Spotlight:模拟聚焦光,非常适合创建聚光灯效果。 • 区域光:用于大面积的均匀照明,可以创建柔和的阴影。 • Sunlight:模拟自然阳光,最适合户外照明。 • 调整灯光位置和强度:移动和旋转灯光以确保它照亮房间的所需区域。您还可以调整光线的强度和颜色以营造不同的氛围。 • 点光源可以放置在房间中间或灯具附近。 • 聚光灯可以放置在天花板上以模拟灯具,指向特定区域。 • 阳光可以放置在室外,以模拟阳光透过窗户。 4. 调整光影效果 要确保正确渲染光照和阴影,您需要进行以下调整: • 照明阴影设置: • 在光源属...

3D Modeling PROJECT 1: HARD SURFACE MODELING

Image
  PROJECT 1: HARD SURFACE MODELING Homework requirements link https://docs.google.com/document/d/1u9dChS5dlZVG6K93jSTCjIjqjp8qb0P7kdAcj1cO1Ck/edit?usp=sharing The production process can be viewed in the document Using Displacement Map 1. Create a Displacement Map: • A displacement map is usually a grayscale image where white areas protrude and black areas remain unaffected. • You can create this map in image editing software (e.g., Photoshop or GIMP). 2. Add a Material: • In the material panel of the object, add a new material. 3. Add a Displacement Node: • Open the Shader Editor, and in the node editor, add a Displacement node. • Link the displacement map to the Height input of the Displacement node. 4. Connect the Displacement Node: • Connect the output of the Displacement node to the Displacement input of the Material Output node.

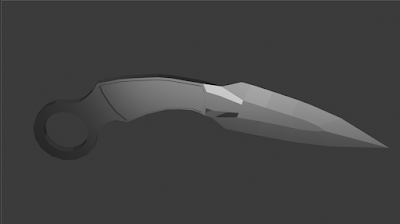
3D Modeling EXERCISE 4: MODELING A KARAMBIT

Image
  EXERCISE 4: MODELING A KARAMBIT Homework requirements link https://docs.google.com/document/d/1u9dChS5dlZVG6K93jSTCjIjqjp8qb0P7kdAcj1cO1Ck/edit?usp=sharing Classroom teaching records

3D Modeling EXERCISE 3: MODELING FROM BOX SHAPE

Image
  EXERCISE 3: MODELING FROM BOX SHAPE Homework requirements link https://docs.google.com/document/d/1muGYkF3GrPKGBh3uw_6VUGzCjeD0TkL5ullpc2MBdLY/edit?usp=sharing Classroom teaching records

3D Modeling EXERCISE 2: MODELING FROM CYLINDRICAL SHAPE

Image
  EXERCISE 2: MODELING FROM CYLINDRICAL SHAPE Homework requirements link https://docs.google.com/document/d/1NubS5zrCtugReXUNSKze9s7MO75Oa2mhKJ9c-Ad-ZVU/edit?usp=sharing In class, the teacher reviewed again and used the stretching, translation, and rotation of cubes to form a table. This lesson uses a cylinder to make a bottle Use modeling tools such as extrusion, slope, insertion, and ring cutting to model objects using the original cylinder. Apply smoothing modifiers and use various techniques to adjust the sharpness or smoothness of angles. The production process can be viewed in the document Basic Modeling Tools • Mesh Edit Mode: Used to adjust vertices, edges, and faces of the bottle. • Extrude Tool: Extends faces to build the 3D structure of the bottle, such as its height and contours. • Scale Tool: Adjusts the size of different parts of the bottle to create curves and transitions. • Loop Cut and Slide: Adds new loop edges to create more details, like patterns...

3D Modeling EXERCISE 1: MODELING FROM PRIMITIVES OBJECTS

Image
  EXERCISE 1: MODELING FROM PRIMITIVES OBJECTS Homework requirements link https://docs.google.com/document/d/1tGFZQVPCGVpVIMsOt_DzBoY4-1PllZHERDrHGLpNdg/edit?usp=sharing         1. Interface Layout and Navigation: • Blender’s interface includes multiple windows (like 3D View, Timeline, Properties Panel, etc.). Beginners need to understand the functions of each area and how to switch between them. • Learn basic view navigation: such as rotating the view with the middle mouse button, zooming with the scroll wheel, and panning the view with Shift + middle mouse button. 2. Basic Operations and Shortcuts: • Familiarize yourself with basic Blender shortcuts (e.g., G: move, R: rotate, S: scale, E: extrude, Tab: toggle edit mode). • Learn how to select objects, with right-click or left-click selection (Blender has an option to switch the default selection method). 3. 3D Modeling Creation and Editing: • Learn how to add basic geometries (suc...

Spatial Design 1 / Project 3: UX-Focused Campus Spatial Design Final Project

Image
  Spatial Design 1 / Project 3: UX-Focused Campus Spatial Design Final Project Project Overview 1. Project Background • Location: Second-floor terrace of the school (27m × 15m). • Surroundings: South side faces the parking lot, north side faces the teaching building. • Objective: Transform the terrace into a functional afternoon tea space that incorporates creativity, interactivity, and comfort. 2. Design Requirements • Spatial Features: Maximum height of three stories, with a circular structure as the main design element, emphasizing creative spatial integration. • Functional Needs: Blend elements of afternoon tea culture and multicultural inclusivity while maintaining smooth and efficient traffic flow. • Special Considerations: • Effective sunshade design for outdoor activities. • Integration with natural environmental factors (e.g., wind direction, light, and shadow). Design Concept 1. Theme • “Harmony and Inclusion”: Utilize circu...